MosoGourmet 妄想グルメのYouTubeチャンネル
| https://www.youtube.com/channel/UC2zXd5Kq9Hu-_bwO1H7CD0g チャンネル登録者数 2,808,391人 |
ユーチューバーのMosoGourmet 妄想グルメについて
| 妄想グルメのチャンネルです。料理やお菓子作りのチャンネルはたくさんありますが、すでにある料理を作るのではなく、妄想した食べ物を作者が作るので完全に見た目重視の作品が登場します。 例えばスイカのお菓子を作ったとしても、味はイチゴであるとかそんな感じです。ちゃんと食べられるお菓子にはなっているので作るだけではありません。 |
-


Marshmallow Popsicle with Mandarin Orange マシュマロアイス みかん入り
I made popsicles that don't freeze rock-hard by adding a few marshmallows.I also added Calpico, a probiotic drink, and canned mandarin oranges to create my favorite flavor.They naturally separate into two layers, making them look even cuter. Let's beat the summer heat!
*Recipe* (Makes 4 servings in 80ml ice cream cups)
Ingredients:
Canned mandarin oranges: 80g
Marshmallows: 20g
Calpico concentrate: 50ml
Milk: 200ml
Instructions :
1.Arrange 80g of canned mandarin oranges in the popsicle molds.
2.Place 20g of marshmallows and 50ml of undiluted Calpis concentrate in a heat-resistant container; microwave at 600W for 50 seconds.Whisk the mixture, and if any marshmallow remains undissolved, heat it a little longer until fully melted.
3.Add 200ml of milk and mix well.
4.Pour the mixture from step (3) into the molds from step (1).
5.Freeze until set.
6.Done. It’s hot out there, so please take care of yourself.
マシュマロをちょこっと入れるだけ。カッチンコッチンにならないアイスを作りました。カルピスとみかんの缶詰も入れちゃって、大好きな味にしてみました。勝手に2層になるからかわいさもアガル。暑い夏を乗り切ろう。
*レシピ*(80mlのアイス容器 4個分)
:材料:
みかんの缶詰 80g
マシュマロ 20g
カルピス原液 50ml
牛乳 200ml
:作り方:
1.アイス容器にみかんの缶詰 80gを並べる。
2.耐熱容器にマシュマロ 20gとカルピス原液 50mlを入れ、600wの電子レンジで50秒加熱する。泡立て器で混ぜ、溶け残るようなら追加加熱してマシュマロを溶かす。
3.牛乳 200mlを入れ混ぜる。
4.(1)に(3)を流し入れる。
5.冷凍庫で冷やし固める。
6.でけた。あっちいから お身体ご自愛ください。 -

Banana Bread (No butter) 節約バナナパウンドケーキ バターなし
I made a budget-friendly banana cake that uses no butter and very little oil, yet still tastes delicious. Please keep this recipe in mind the next time you come across some ripe bananas on sale.
*Recipe* (For one 18cm loaf pan / 600ml capacity)
Ingredients:
Ripe bananas: 2–3 (150–225g net weight)
Sugar: 50g
Vegetable oil: 50g
Eggs: 2
Vanilla oil: 10 drops
Cake flour: 150g
Baking powder: 5g
Instructions:
1.Mash 2 ripe bananas (150g net weight). It’s also delicious if you use 3 bananas instead.
2.Add 50g sugar, 50g vegetable oil, 2 eggs, and 10 drops of vanilla oil, mixing well after each addition.
3.Sift in 150g cake flour and mix.
4.Chill in the refrigerator for 10 minutes (to minimize gluten development). Preheat the oven to 180°C.
5. Remove the batter from the refrigerator, add 5g of baking powder, and mix thoroughly in a circular motion.
6.Pour the batter into a loaf pan lined with parchment paper. I used 470g of batter, filling the pan about 80% full.
7.Bake for 30 minutes in the oven preheated to 180°C. Check for doneness with a bamboo skewer or similar tool.
8.Once baked, remove from the pan and wrap in a paper towel followed by plastic wrap. This technique ensures the cake stays moist despite the low oil content.
9.Done. Let it cool slightly, then slice and enjoy.
バターを使わない、少ないオイルでもちゃんとおいしい、節約バナナケーキを作りました。お買い得になった熟したバナナに出会ったら思い出してください。
*レシピ*(18cm パウンド型/満水時 600ml 1個分)
:材料:
熟したバナナ 2〜3本(正味 150〜225g)
砂糖 50g
植物油 50g
卵 2個
バニラオイル 10滴
薄力粉 150g
ベーキングパウダー 5g
:作り方:
1.熟したバナナ 2本(正味 150g)をつぶす。バナナを3本に増やして作ってもおいしいです。
2.砂糖 50g、植物油 50g、卵 2個、バニラオイル 10滴を入れ都度混ぜる。
3.薄力粉 150gをふるい入れ、混ぜる。
4.冷蔵庫で10分冷やす。(グルテンを増やしにくくする為)オーブンを180℃に予熱する。
5.冷蔵庫から取り出した生地にベーキングパウダー 5gを入れしっかりぐるぐると混ぜる。
6.オーブンシートを敷き込んだパウンド型に生地を入れる。生地は470g入れました。8分目程度です。
7.180℃に予熱したオーブンで30分焼く。焼き上がりを竹串などで確認する。
8.焼き上がったら、型から外し、キッチンペーパーとラップで包む。少ない油分でもしっとりさせるテクニックです。
9。でけた。粗熱が取れたら切り分けて、めしあがれ。 -

Mizuame (starch syrup) Chocolate 水飴チョコ
I tried making the "mizuame" (starch syrup) chocolate I saw on social media. At first, I thought the combination of starch syrup and chocolate sounded like total overkill—but when I actually made it, the result was a delicious chocolate with a luscious, gooey syrup center.Apparently, on social media, it was being featured as ASMR or mukbang content, so it seems the focus wasn’t really on how tasty it was...
*Recipe*
Ingredients:
Sprinkles (as desired)
White chocolate 90g
Starch syrup 40g
White chocolate 80g
Instructions :
1.Sprinkle colored sprinkles into a silicone mold.
2.Pour in 90g of melted white chocolate and chill in the refrigerator until the surface sets slightly.
3.Add 40g of starch syrup, then pour 80g of melted white chocolate over it. Sprinkle with colored sprinkles and chill in the refrigerator until firm.
4.Done. If you break the chocolate horizontally, you can enjoy the sparkling effect of the starch syrup! Just make sure not to break it vertically.
SNSで見かけた水あめチョコを作ってみました。水飴とチョコレートなんてやり過ぎな食べ物じゃん!と作ってみたら とろっとした水飴が入った とってもおいしいチョコレートが出来上がりました。コワイくらいに普通に食べられる。カロリーは考えないことにします。
*レシピ*
:材料:
カラースプレー 適宜
ホワイトチョコレート 90g
水あめ 40g
ホワイトチョコレート 80g
:作り方:
1.シリコン型にカラースプレーを散らす。
2.溶かしたホワイトチョコレート 90gを入れ、軽く表面が固まるまで冷蔵庫で冷やす。
3.水飴 40gを入れ、その上に溶かしたホワイトチョコレート 80gを入れる。カラースプレーを散らし、冷蔵庫で冷やし固める。
4.でけた。チョコレートを横方向に割ると水飴のキラキラがたくさん楽しめます!縦に割っちゃダメだよ。 -

Dot Ice Cream Chocolate Banana ドットアイス チョコバナナアイスクリーム
Since "dot cakes" are going viral, I thought, "Why not have dot ice cream, too?" So, I decided to make some. I filled an ice cream cone with chocolate and banana ice cream, topped it with plenty of sugar sprinkles, and voilà—a colorful, cute "dot ice cream" is ready to enjoy.
*Recipe* (Makes 6 ice cream cones)
Ingredients:
Chocolate 100g (about 35g left over)
Banana 130g
Greek yogurt 130g
Maple syrup 75g
Sugar sprinkles (as desired)
Instructions :
1.Place 100g of chocolate into a piping bag and melt it over a double boiler (hot water bath).
2.Coat the inside of the ice cream cones with the melted chocolate. (I had about 35g of chocolate left over.)
3.Chill in the refrigerator to let the chocolate set.
4.Make the banana ice cream.Combine 130g of banana, 130g of Greek yogurt, and 75g of maple syrup, then blend until smooth.
5.Pour the mixture from step (4) into the cones from step (3) and freeze until solid.
6.Dip the top of the ice cream into sugar sprinkles spread on a flat plate to decorate.
7.All done! A cute and delicious ice cream treat with a polka-dot look is ready.
ドットケーキがあるならドットアイスも、ということでチョコバナナをイメージしたコーン入りのアイスを作りました。トップにシュガースプリンクルをたっぷりつけて、カラフルかわいいドットアイスができました。
*レシピ*(アイスコーン 6個分)
:材料:
チョコレート 100g(35gほど余りました)
バナナ 130g
ギリシャヨーグルト 130g
メープルシロップ 75g
シュガースプリンクル 適宜
:作り方:
1.チョコレート 100gを絞り袋に入れ、湯煎で溶かす。
2.アイスコーンの内側を溶かしたチョコでコーティングする。チョコは35gほど余りました。
3.冷蔵庫で冷やしチョコを固める。
4.バナナアイスを作ります。
バナナ 130g、ギリシャヨーグルト 130g、メープルシロップ 75gを合わせ、ペースト状にする。
5.(3)のコーンに(4)のアイス液を流し入れ、冷凍庫で固める。
6.平らなお皿に出したシュガースプリンクルにアイスのトップを付け、飾る。
7.でけた。粒々かわいい&おいしいアイスができました!
Follow me!
こちらのYoutuberも人気です

 【速水もこみち 公式チャンネル】M’s TABLE by Mocomichi Hayami 人気俳優の速水もこみちが料理を作るチャンネル。テレビで人気コーナーとなったモコズキッチンが終了して肩を落としていた方におすすめ。テレビコー […]
 てぬキッチン/Tenu Kitchen 身近な食材を使ったアレンジ料理の紹介をメインにしたYoutubeチャンネルです。時短、少な目材料、放置系レシピが多いです。
市販品のヨーグ […]
てぬキッチン/Tenu Kitchen 身近な食材を使ったアレンジ料理の紹介をメインにしたYoutubeチャンネルです。時短、少な目材料、放置系レシピが多いです。
市販品のヨーグ […]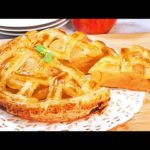 HiroMaru CooK TV 管理栄養士でもあるひろまるさんの料理チャンネルです。主にスイーツ作り動画をアップされており、どれも超本格的な仕上がりのお菓子ばかりです。可 […]
 はるあん 可愛らしい女性の方が料理をひたすら作るチャンネルです。高校を卒業したばかりとあって初々しいですが、料理の腕は本物。ベテランの雰囲気を醸し出 […]
 papadesuyo777 趣味の料理を紹介されているチャンネルです。
[…]
papadesuyo777 趣味の料理を紹介されているチャンネルです。
[…] みきママChannel 料理を解説しながらクッキングしてくれているので見よう見まねをすることが出来ます。本当に分かりやすく説明をしてくれているのでかなり感謝をして […]