my mechanicsのYouTubeチャンネル
| https://www.youtube.com/channel/UCMrMVIBtqFW6O0-MWq26gqw チャンネル登録者数 94.2万人 |
ユーチューバーのmy mechanicsについて
| 自宅に錆びついて何十年も放置された機械はありますか?男なら一度は憧れるメカニックな鉄の世界を見てみよう。もう土に還りそうなサビに錆びまくった機械を丁寧な仕事と技術で再生!みるみるうちに新品のような輝きを取り戻していく機械たち。ついつい見てしまう華麗なテクニックをどうぞ。 |
-


The Datsun 240Z Restoration So Far - 2.5 Years in One Video (Part 1-8)
In this video you can see part 1 to 8 of the Datsun 240Z restoration combined. In this video you can see the full disassembly of the car, the complete bodywork, the blasting and primer, the paint preparation and the actual final painting and also the complete detailled restoration from both axles and the differential. Check out the individual videos for more.
I hope you like my work and the video.
Timestamps:
00:00 Disassembly (Part 1)
13:11 Bodywork (Part 2)
35:14 Bodywork (Part 3)
58:25 Blasting and Primer (Part 4)
1:06:34 Prep and Paint (Part 5)
1:17:31 Front Axle (Part 6)
2:01:45 Rear Axle (Part 7)
2:37:14 Differential (Part 8)
Huge thank you to all of my Patreon and PayPal supporters and especially to:
Aaron White
Adel AlSaffar
August Kupfer
Sigoss Family
Bethany Burns
Bill Baith
Bold Cheddar
Clint Fisher
Dane Prince
Derilas
Edward Conway
Ethan Travis
Georges Massot
GibsonFinishing
Ian Henry
Jim Wasko
John Shebanow
Joseph Kamps
Josh Ledford
Joshua Scher
Kar
Keith McComb
Kerem Yollu
Kyle O'Keefe
Lambda AI Cloud
Marcus H.
Michael Fleisher
Michael Kemmet
Mo B
Nicholas
Nick Houston
NoLoneSurvivor
Peter Cyprian
Peter Pearson
ReddDirt
Ryan Pickett
Sal
Scott Tomlin
Shao Zhang
Stefano Di Biase
Tory2025
Tyler Carruth
Vickie Bligh
Vince Valenti
Yale Baker
Albert Siemers
Alex Herstedt
Alex Manning
Andre
Andrew Shone
Andrey
Anthony Apellido
Arni Bjorgvinsson
Ben Simmonds
Benny
Brian Hoerl
Caleb Betczynski
Chad Bryant
Charles D
Chris Faehl
Chris Visscher
Chris Walter
Christian Fjelldal
Christopher Lobay
Crystal Cash
Cyril
Damien Fuller-Sutherland
Daniel Varga
Dave Hardware
David Lehnus
David P Hruska
David Thompson
Derson Jacomini
Dustin Davis
Erik Nordby
Ethan Mc
H D
Hakan Uzunoglu
Jack Curry
JacopoBello
James Hare
James Mellicant
Jason Stowe
Jason Weber
Jeff Agner
Jesus Fernandez Cortes
Joseph Coates
Justin Miller
Kay Smits
Kiro Ivanovski
Kyle
L0XIS
Labradog
Laurent Bolli
Lil' Brummbino
Lisa Doyle
Marc Cerisier
Mark
Mary Casella
Matteo Capo
Matthew Johnson
MDC
Michał Święcki
Mihai
Norbert Spaar
Oleksandr
Oliver
Pat Nakajima
Raoul Kriesi
regetskcob
repülő búgás
Roan Fryer
Robert Landrum
Rupert Purcat
Sarah B.
Scott Brooks
Scott Marshall
Sean Sands
Spencer Kormos
Stanley Dimant
Stefan Heymanns
Steve McVicker
Svenja Kuckla
Thanny
Tim Holt
Timofey Lychik
TLeaf
Trevor Kam
Tucker Ifft
Willard
William
If you have any questions about the process, machines i'm using or other stuff, just ask me in the comments. I read them all and i try to reply as soon as possible.
Sorry for my bad english, it's not my language. I try my best to improve my technical english.
Subscribe for more of my content. I'm uploading videos about mechanical stuff, as new creations and buildings and also restorations.
Thank you for watching 🙂
„I make a new one“ T-Shirts:
https://teespring.com/stores/my-mechanics
My Main Channel:
https://www.youtube.com/mymechanics
My Second Channel:
https://www.youtube.com/c/mymechanicsinsights
My Patreon Page:
https://www.patreon.com/mymechanics -
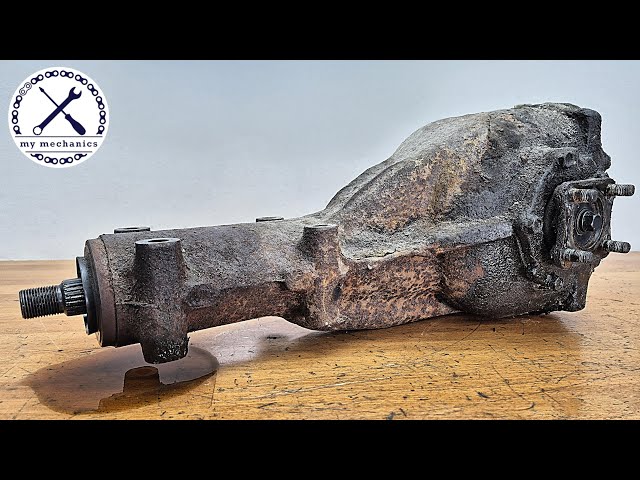
Filthy Datsun 240Z Differential
In this video I'm restoring the differential from the Datsun 240Z.
I started to disassembly the R180 differential, when I quickly realized that it has the longest available ratio with 37:11. Which is 3.36 turns from the drive shaft and one turn on the wheel. Since I'm upgrading the transmission from a four speed to a five speed I definitely need a shorter ratio.
I was able to buy a 39:10 (3.9) ratio from a Swiss 240Z. It already looked in much rougher condition from the outside and it also showed a lot of wear on the inside. The pinion and ring gear looked perfectly fine though. Therefore I decided to also disassemble my 3.36 diff. I quickly noticed that all components are in much better condition, so I made the decision to only use the ring gear and pinion from the 3.9 diff and put that into mine.
The swap was straight forward and since I installed all new bearings I needed to re-shim it all anyway. I haven't shown any of that in the video, but a lot of measuring, calculating and trial and error was needed to have the diff properly back together.
After finishing the diff, it was time to install the rear axle back together on the car. Before I could do that I needed to install a bunch of stuff to the chassis first. I restored all these components off camera to save time. I restored the fuel and brake lines, hand brake mechanism, pedal box, diff belt, brake master cylinder, clutch cylinder, brake switch and brake proportioner. The whole reassemble went pretty smooth.
The car is now finally standing back on its own wheels since I started to disassemble it back in May 2023. I think it really looks amazing and I can't wait to further put it back together. Next big step on the list will be the engine and transmission restoration.
Stay tuned.
I also want to say a huge thanks to DCW Classic from Lithuania. He's such an immense help with this project. His huge experience and knowledge is very helpful. I also want to say thanks to Mister patina for the powder coating, S30.World for the firewall insulation and the hand brake cable, KW Suspension for the nice coilovers and the black springs.
I hope you like my work and enjoy the video.
Huge thank you to all of my Patreon supporters and especially to:
Aaron White
Adel AlSaffar
August Kupfer
Ben Burns
Bill Baith
Sigoss Family
Bold Cheddar
Brenna Redpath
Chris Ulivarri
Clint Fisher
Dane Prince
Derilas
Edward Conway
Jim Wasko
John Shebanow
Joseph Kamps
Josh Ledford
Joshua Scher
Kar
Keith McComb
Kerem Yollu
Kyle O'Keefe
Lambda GPU Workstations
Marcus H.
Mark Tesmer
Michael Fleisher
Mo B
Nick Houston
NoLoneSurvivor
Peter Cyprian
Peter Pearson
R.A.
ReddDirt
Scott Tomlin
Shao Zhang
Stefano Di Biase
Stuart
Tyler Carruth
Vickie Bligh
Vince Valenti
Yale Baker
Albert Siemers
Alex Manning
Alexander Hasselbach
Andre
Andreas
Andrey
Anthony Apellido
Anton Pchelkin
Arni Bjorgvinsson
Ben Humphrey
Ben Simmonds
Benny
Bonnie Williamson
Brian Hoerl
Caleb Betczynski
Chad Bryant
Charles D
Chris Faehl
Chris Visscher
Chris Walter
Christian Fjelldal
Christopher Lobay
Crystal Cash
Cyril
Damien Fuller-Sutherland
Daniel Varga
Dave Hardware
David Lehnus
David P Hruska
David Thompson
Derson Jacomini
Dustin Davis
Eddie
Erik Nordby
Ethan Mc
Gareth Rimmer
H D
Hakan Uzunoglu
Ivan Eugenio
Jack Curry
JacopoBello
James Hare
Jesus Fernandez Cortes
Joseph Coates
Justin Miller
Kiro Ivanovski
L0XIS
Labradog
Laurent Bolli
Lil' Brummbino
Marc Cerisier
Mary Casella
Matteo Capo
Matthew Johnson
MDC
Michał Święcki
Mihai
Norbert Spaar
Oleksandr
Pat Nakajima
Raoul Kriesi
repülő búgás
Roan Fryer
Robert Landrum
Rupert Purcat
Sam
Sarah B.
Scott Brooks
Scott Marshall
Sean Sands
Spencer Kormos
Stanley Dimant
Stefan Heymanns
Steve McVicker
Svenja Kuckla
Thanny
Tim Holt
Timofey Lychik
TLeaf
Trevor Kam
Tucker Ifft
William
Максим Гусев
Sorry for my bad english, it's not my language. I try my best to improve my technical english.
Thank you for watching 🙂
„I make a new one“ T-Shirts:
https://teespring.com/stores/my-mechanics
My Second Channel:
https://www.youtube.com/c/mymechanicsinsights
My Patreon Page:
https://www.patreon.com/mymechanics -

Datsun 240 Restoration Part 7 - Rear End Perfection
In this video I'm fully restoring the complete rear axle, except the differential. I took the full assembly off the car in the teardown in episode 1. At first it looked like a quick and easy job, but after seeing all the parts after disassembly I knew this might take a little longer. I decided to go with a classic finish and paint them all in matt black. Almost all parts made of steel have been yellow zinc plated by a local company. This is a very good rust protection. On top of that Mister Patina powder coated the parts, this is a double protection and these parts should never ever rust again.
I'm also installing adjustable coilovers by KW in the rear. These came with the classic KW colors yellow and purple. This color scheme looks really cool, but it doesn't fit so well with the classic car. Luckily they also offer these parts in black with their so called „Classic Line“.
The rear sway bar was an aftermarket one. Its links were put together by a bunch of pieces. I decided to remake them in the same style as the original ones in the front. Doing that I was able to reuse the jig I made for the front axle for bending the special washers and also making the nylon lock nuts.
The drums from the brake looked really bad at first. A broken fin and damage on almost all edges. With a bit of TIG welding from my friend material was quickly added back and brought back to shape with some hand files. New brake shoes, brake cylinder and new springs and the rear brake is in perfect condition again. You may ask why I haven't done a disc conversion. Simply because the original brakes are quite good if adjusted well and since I'm keeping the engine pretty much stock, better brakes are not really needed. I also really like the look of the drum brakes.
The half-shafts were a little project on their own. The two sliding pieces were not zinc plated, because the plating would change the tolerances of the inside and may cause problems.
In this video I restored everything except the differential. This and the complete reassembly of the rear axle back to the car will come in episode 8 next week.
I also want to say a huge thanks to DCW Classic from Lithuania. He's such an immense help with this project. His huge experience and knowledge is very helpful. I also want to say thanks to Mister patina for the powder coating, KW Suspension for the nice coilovers and the black springs.
I hope you like my work and enjoy the video.
Huge thank you to all of my Patreon supporters and especially to:
Aaron White
Adel AlSaffar
August Kupfer
Ben Burns
Bill Baith
Sigoss Family
Bold Cheddar
Brenna Redpath
Chris Ulivarri
Clint Fisher
Dane Prince
Edward Conway
John Shebanow
Joseph Kamps
Josh Ledford
Joshua Scher
Kar
Keith McComb
Kerem Yollu
Kyle O'Keefe
Lambda GPU Workstations
Marcus H.
Mark Tesmer
Michael Fleisher
Mo B
Nick Houston
NoLoneSurvivor
Peter Cyprian
Peter Pearson
R.A.
ReddDirt
Scott Tomlin
Shao Zhang
Stefano Di Biase
Stuart
Tyler Carruth
Vickie Bligh
Vince Valenti
Yale Baker
Albert Siemers
Alex Manning
Andre
Andrey
Anthony Apellido
Anton Pchelkin
Arni Bjorgvinsson
Ben Humphrey
Ben Simmonds
Benny
Bonnie Williamson
Brian Hoerl
Caleb Betczynski
Chad Bryant
Charles D
Chris Faehl
Chris Visscher
Chris Walter
Christian Fjelldal
Christopher Lobay
Crystal Cash
Cyril
Damien Fuller-Sutherland
Daniel Varga
Dave Hardware
David Lehnus
David P Hruska
David Thompson
Derson Jacomini
Dustin Davis
Eddie
Erik Nordby
Ethan Mc
Gareth Rimmer
H D
Hakan Uzunoglu
Ivan Eugenio
Jack Curry
JacopoBello
James Hare
Jesus Fernandez Cortes
Joseph Coates
Justin Miller
Kiro Ivanovski
L0XIS
Laurent Bolli
Lil' Brummbino
Marc Cerisier
Mary Casella
Matteo Capo
Matthew Johnson
MDC
Michał Święcki
Mihai
Norbert Spaar
Oleksandr
Pat Nakajima
Raoul Kriesi
repülő búgás
Roan Fryer
Robert Landrum
Rupert Purcat
Sam
Sarah B.
Scott Brooks
Scott Marshall
Sean Sands
Spencer Kormos
Stanley Dimant
Stefan Heymanns
Svenja Kuckla
Thanny
Tim Holt
Timofey Lychik
Trevor Kam
Tucker Ifft
William
Максим Гусев
Sorry for my bad english, it's not my language. I try my best to improve my technical english.
Thank you for watching 🙂
„I make a new one“ T-Shirts:
https://teespring.com/stores/my-mechanics
My Second Channel:
https://www.youtube.com/c/mymechanicsinsights
My Patreon Page:
https://www.patreon.com/mymechanics -

1917 Swiss Bead Roller Restoration - Making New Ones for a Masterpiece
Before watching this video, I highly recommend watching this one first: https://youtu.be/zBIqITpCV9U
In this video I'm restoring an antique bead roller made in Switzerland around 1917. A subscriber from Switzerland sent me this one. It was an old machine in their company, which they would otherwise threw onto the steel waste for recycling.
I started this restoration pretty much exactly two years ago. Back then I knew I need a bead roller for the car restoration, so this would be the perfect item. After being 15 days into this restoration I had to put it aside and started working on the car. I could not finish this project in time, so it was sitting on my shelf for around 1.5 years. After I finished the front axle restoration it was time to finally finish the bead roller.
I've spent another 21 days to finish it, so 36 days in total. There were so many parts to machine to get this bead roller back to perfectly working condition. I restored all the original pieces that were left and replaced all the not original ones. I tried my best to design replacement parts that will match an over 100 years old design. I'm pretty happy with the overall appearance. There were so many changes done to it: hexagon clamping screws changed to slotted domed head ones, thumb screw for clamping the dead stop and adjuster lever, completely new handle for the depth adjuster, completely new crank built from scratch and longer shafts to extend the throat. All guided sections for the shafts have been freshly machined and new sleeves have been installed where necessary. I decided to keep a structured surface on the body and only knock off the highest casting marks and fill in the lowest holes and such with body filler and not go with a perfectly smooth surface. I really like that combination with the glossy black paint, the antique brass tag and all the freshly machined parts with a brushed nickel plated finish.
The bead roller is now in perfectly working condition and I'll keep it in the shop to use it for other projects in the future. Can't wait to make new dies for it for other applications.
I hope you like my work and enjoy the video.
Huge thank you to all of my Patreon supporters and especially to:
Aaron White
Adel AlSaffar
Alfonso Baz
Andrew Egerton
August Kupfer
Ben Burns
Sigoss Family
Bold Cheddar
Brenna Redpath
Chris Ulivarri
Edward Conway
John Shebanow
Joseph Kamps
Josh Ledford
Joshua Scher
Kar
Kerem Yollu
Kyle O'Keefe
Lambda GPU Workstations
Lorraine Hughes
Marcus H.
Mark Tesmer
Michael Fleisher
Mo B
Nick Houston
NoLoneSurvivor
Peter Cyprian
Peter Pearson
ReddDirt
Ricky Adolphe
Ryan Pickett
Scott Tomlin
Stefano Di Biase
Stuart
Tyler Carruth
Vickie Bligh
Vince Valenti
Yale Baker
Albert Siemers
Alex Manning
Andre
andrew
Anton Pchelkin
Arni Bjorgvinsson
Ben Simmonds
Benny
Big Ole' Bran
Bobby herrera
Bonnie Williamson
Brian Hoerl
Briscolone05
Bruce Boschek
Caleb Betczynski
Chad Bryant
Charles D
Chris Faehl
Chris Visscher
Chris Walter
Christian Fjelldal
Christopher Lobay
Communidad
Damien Fuller-Sutherland
Daniel Varga
Dave Hardware
David Chang-Yen
David Lehnus
David P Hruska
David Thompson
Derson Jacomini
Dustin Davis
Eddie
Erik Nordby
Flo Sauter
Gareth Rimmer
Hakan Uzunoglu
Heidi Jeffs
Ivan Marks
Jack Curry
JacopoBello
James Hare
Jesus Fernandez Cortes
Justin Miller
Kiro Ivanovski
Kyle Edgar
Laurent Bolli
Leevi Kontkanen
Marc Cerisier
Mary Casella
Matthew Johnson
MDC
Mihai
Máté Tamás Molnár
Norbert Spaar
Oleksandr
Oliver Quandt
Panagiotis Mavrommatis
Pat Nakajima
Rania Zainalabedin
Raoul Kriesi
repülő búgás
Roan Fryer
Rob Sherfick
Robert Landrum
Ross Clark
Sam
Sarah B.
Scott Brooks
Scott Marshall
Sparrow
Spencer Kormos
Stanley Dimant
Stefan Heymanns
Svenja Kuckla
Taylor Stimpson
Thanny
Tim Holt
Timofey Lychik
Trevor Kam
Tucker Ifft
wdwfan78
William
Sorry for my bad english, it's not my language. I try my best to improve my technical english.
Thank you for watching 🙂
„I make a new one“ T-Shirts:
https://teespring.com/stores/my-mechanics
My Second Channel:
https://www.youtube.com/c/mymechanicsinsights
My Patreon Page:
https://www.patreon.com/mymechanics
Follow me!
こちらのYoutuberも人気です
 Y NAKAJIMA 自作の不気味な電子工作を動かす映像を投稿しているチャンネル。工作の素材は主におもちゃで、「機関車トーマス」のおもちゃや「TENGA」などを […]
 無駄づくり / MUDAzukuri 吉本興業所属のYouTuber […]
 植物男子 Asu 自然庭園をテーマとしたアクアテラリウムの制作過程を紹介しています。
水槽の中にミニチュア模型のような自然が凝縮された世界観を表現しています […]
植物男子 Asu 自然庭園をテーマとしたアクアテラリウムの制作過程を紹介しています。
水槽の中にミニチュア模型のような自然が凝縮された世界観を表現しています […] モアクリ 子猫を飼っている飼い主が、丁寧に子猫の日常を映している。子猫が飼い主に懸命に何かを話しかけている様子や、肉球の手入れ、身体のシャンプー、動 […]
 Fischer’s-セカンダリ- 色んな遊びを、面白い大人たちが本気でやり尽くす番組です。中には、絶対に真似をしてはいけないような危険な遊びから、身近な環境でもチャレンジで […]
 Chickensan よく見かけるあの鳥のおもちゃでこんなことが出来るのかと発想の転換がまさに動画になったと感じるチャンネルです。一度でも聞いたことのある曲をこ […]